Tag Archives: Food

Cheddar Biscuits

Cheddar Biscuits

One of my girls’ favorite restaurants is Red Lobster. I must agree with them when it comes to their tasty cheddar biscuits.

They are so addictive that it’s extremely difficult to just have one. Totally sinful!!!

I set out to try to make those biscuits as best as I can…. I’ve tried several ways with additions and omissions to finally get the closets thing I could to the real thing.

Try them out and tell me what you think!
Ingredients:
2 1/2 cups Bisquick baking mix
¾ cup cold whole milk
4 tablespoons cold butter (1/2 stick)
1/4 teaspoon garlic powder
1 cup cheddar cheese (heaping), grated

Directions:

Preheat your oven to 400 degrees.

Combine Bisquick with cold butter in a medium bowl using a pastry cutter or a large fork. You don’t want to mix too thoroughly.

There should be small chunks of butter in there that are about the size of peas. Add cheddar cheese, milk, and 1/4 teaspoon garlic.

Mix by hand until combined, but don’t over mix.

Drop approximately 1/4-cup portions of the dough onto an ungreased cookie sheet using an ice cream scoop.

Bake for 15 to 17 minutes or until the tops of the biscuits begin to turn light brown.

Meanwhile Prepare the topping:
2 tablespoons butter, melted
1/4 teaspoon dried parsley flakes
1/2 teaspoon garlic powder
pinch salt

When you take the biscuits out of the oven. Use a brush to spread this garlic butter over the tops of all the biscuits.

Use up all of the butter.
2
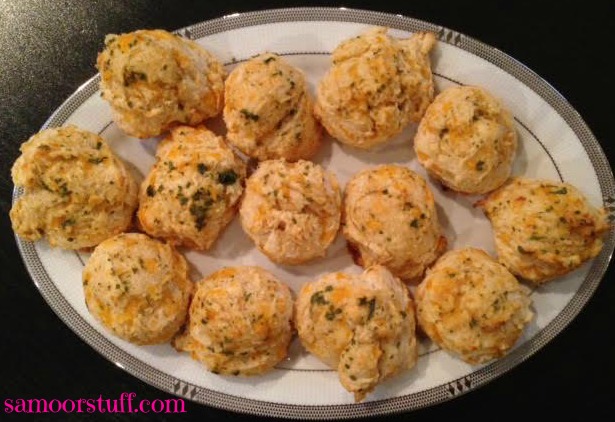
This batch made about 14 biscuits.

Off course the minute I put them out on the table Zeenah couldn’t wait to dive right into them!!!

zee

The look on her face says it all…. I’m pretty sure that fits right into Making Life Memorable for her!

Quick Fix Dinner

Quick Fix Dinner

There are times in every mother’s life where all she needs is a quick fix dinner because some activity ran too late and bedtime is approaching and there isn’t much time to prepare a “proper” Dinner.

On days like these I often turn to a simple mix & Match of veggies.

Those days I open up my freezer and it’s vegetables feast!!

IMG_5329

So the menu is:
Green Peas & Corn
Brussels Sprouts
“House” Salad with oil & vinegar dressing
Edemame
Cream of Mushroom Soup

Healthy, filling and quick dinner what more can a mom ask for after a hectic day?

So the next time you’re stuck and don’t have time remember Mix & Match what you have and concentrate on Making Life Memorable.

One Pot Meal

One Pot Meal

I am easily inspired on a daily basis by little things I come across to make this blog interesting to different type of moms.

When I say different kinds I mean not every mom is a crafter, baker or “busy body” like me.

But one thing is for sure is that EVERY mom always has the “what’s the meal of the day?”

One of the many E-newsletters I receive is that of Martha Stewart. I am also proud that I have been nicknamed “SAMartha” and hope to someday build an empire like her. But for the time being I’m happy being a mommy that gets to post what I love to do.

Last Friday there was a challenge for a “one pot” meal so I decided to share one of my own creations of a “one pot” meal on the blog since I’d probably not qualify for Martha’s challenge…. I am millions of miles away after all!

Easy Child-Friendly Chili

Ingredients:
2 tablespoons olive oil
250g Minced Meat
1 large Onion, diced (that means chopped reeeeeally small)
2 cloves Garlic, Crushed
1 Carrot, Diced
1 Green Pepper, Diced
1 Red Pepper, Diced
1 can chopped tomato, undrained
1 can Red kidney beans, undrained
2 Tablespoons tomato paste
1 cup water
Salt & pepper to taste

Directions:
In a large pot heat olive oil, add onion & garlic and fry until golden.

Add minced meat and cook stirring constantly until all browned.

Add all other ingredients except the water and combine well, stirring constantly until the carrots are slightly tender.

Add water, mix & let simmer 20 minutes. Stirring occasionally.

ONEPOT
All done!!

I hope that this has inspired you for your next meal!!

Enjoy Making Life Memorable your way!

Taste Of the Holidays

Taste Of the Holidays

The Holiday season is by far my favorite part of the year. Festivities, events, great company and good food!! What more can one ask for??

I’m kicking off the season with my first event of them all! A Tasting event at my shop. Visit us for treats, hot cocoa and a fabulous gifting experience.

The original Basket Boutique at Kipco Tower is ready to be your host. Share the fun and bring your family and friends.

Tasting event

Baked Chicken Strips

Baked Chicken Strips

I’ve shared with you a few of the “sweet” tasting foods and it’s time to share something from the savory department.

I’m an advocate of home made and freezing over buying something from the frozen section at the grocery store. How can “fresh” meat last for 2 years? Doesn’t make sense to me. PRESERVATIVES!!! If I can avoid it then I will.

Not to say I don’t indulge one in a while but when it comes to the kids I’d rather not.

My baked recipe uses fresh chicken breasts that I prepare and freeze for up to 6 months and tastes fabulous, if I may say so myself. The added health perk is I don’t fry I bake them and they turn out just as crispy.

Ingredients
Ingredients:
4 chicken breasts, cut into strips
1 1/2 Cup breadcrumbs
2 Eggs
1/2 Cup Flour
1/2 Cup Butter


Directions:
Preheat oven 175 degrees C (350 degrees F)

Coat each strip of chicken in the flour followed by dipping in the egg then coating in the breadcrumbs.

Place on a cookie sheet.

If you intend to freeze place the cookie sheet in the freezer for 20 minutes until the breadcrumbs holds, remove from cookie sheet and place in an airtight container place aluminum foil in between layers, return to freezer. Stores up to 6 months.
strips


To cook:
Melt butter in microwave.

Pour melted butter on each strip. bake in the oven for 15 minutes, turn each strip and bake for additional 5 minutes.

The same baking method is used for frozen strips but add an additional 10 minutes to the baking.

This recipe is great because you can make a really big batch and freeze. Useful for lunch box, birthday party menu, play dates and quick dinners.

chick

Vanilla Cake

Vanilla Cake

My standard Vanilla Cake works well in making either a 2 layered Cake or 24 cupcakes.

It’s really a classic recipe that’s beyond basic but perfect in every way.

The reason I like this recipe is because it’s not too sweet which makes up for the sweetness of the frosting.

Ingredients
3 cups flour
1 3/4 cups sugar
1 Tablespoon Baking Powder
1 1/2 Cup Milk
1/2 cup Butter (Softened)
2 teaspoon Vanilla
2 Eggs

Directions
Preheat oven 175 degrees C (350 degrees F)

In a bowl combine All ingredients except Eggs.

Mix with an electric mixer until it’s all combined.

Add Eggs one at a time and continue mixing.

VanillaCupcake
For cake use two 9inch round pans (greased & floured) Bake fore 30 minutes
For Cupcakes Line cupcake pan with cupcake liners Bake for 15 minutes.

Remove from oven and let cool before frosting.

My favorite ButterCream frosting will elevate the taste to the next level!

Special “Butter” Tip
If you’re anything like me and have to make a cake in between your other daily plans then you generally don’t have time to let butter come to room temperature and be naturally softened.

Use this tip! Slice butter into several cubes and microwave for 20 seconds at a time until its soft but not melted. It’ll also make it easier to measure.

Recipe Sharing!!

Recipe Sharing!!

I hope you enjoyed last weeks series of posts about how you can plan your child’s next birthday with my simple tips.

I still have so much more to add to the theme that I’ve decided to have a follow-up series with more details to birthday planning.

I’ll be posting my best recipes that are great to cook ahead of time so you can be free the day of the birthday to do your last minute setup, decorating and socializing with other parents.

On Saturday I posted the best ButterCream frosting in the whole wide world! It’s fail proof and you can store it in an airtight container in the refrigerator for up to 3 weeks.

Stay tuned for my Vanilla Cake and Chocolate Fudge cake. Both are mild in sweetness and go perfectly with the ButterCream frosting.

I’ll also share a few of my signature savory dishes like “Easy Cheesy Pasta bake” and my famous “Pasta in Pink Sauce.”

Creamy potato Salad and my favorite Asian Salad dressing that’s perfect for any type of green salad.

Finally I’ll also share my freezer friendly Chicken strips and meatballs. I usually prepare loads of these recipes since they’re perfect for lunchbox, quick dinners and impromptu play date meals.

The important thing to always remember is that you’re “making life memorable” with all your special moments and food is an accessory to that!

Birthday Menu & Quantities

Birthday Menu & Quantities

Yummy Yummy Yummy…. Let’s get cookin!

The million dollar questions are without a doubt “what should I serve?” & “Is it enough?”

First off decide what you’re going to serve. The best is always finger foods. A variety of easy to eat no fuss no mess so you can enjoy the party too…

I basically have a standard menu:
BuffetFresh Veggie Platter: Carrots, cucumber, baby tomato, Celery, Green Pepper, Paprika, Broccoli, Cauliflower
Popcorn
2 kinds of Salads for adults
Mini Pizza
Hot Dog Rolls (Always the first to disappear)
Mini Burgers
Mini Chicken burgers
Variety of mini sandwiches & pastries (also known as Fatayer) Fillings include Spinach, cheese, vegetables, Feta, Minced Meat, Turkey…etc
Pasta Bake

Drinks is usually:
Water
KoolAid
Fresh Lemonade

 
Next is how much to serve. This is essential. You don’t want to have too much leftover but still want to make sure there’s enough.

The biggest hit are generally the Mini Pizzas and hot Dogs. So I usually Have about 6 for each per child.

As for the Mini Burgers (Beef&Chicken) I make 2 dozen of each for approximately 30 children.

Pastries & Mini Sandwiches I usually do a total 4 pieces per guest.

1 large casserole of Pasta that’s prebaked so that I don’t have to worry about it during the party.

The drinks are easier to calculate 2 1/2 Cups for every guest. But make sure to provide loads of water. Having excess won’t hurt!

I also provide a Thermos with hot water and selection of teas and coffees for the parents to help themselves.

Now if you choose a different menu here’s a good guideline for quantities:
Menu&QTY

Bar-PicMonkey Collage In the past two birthdays I went a little overboard in the “Sweet” department and had a little area with something of a toned down version of a Candy Bar. A selection of Marshmallows, chocolate coated cookies, Carmel popcorn, Lollipops…etc. Bit I had to make sure it was theme related or at least color coordinated.

There’s really no limitations as to what you can serve and how! If you have it in you go for it, if not keep it simple for less stress.

I love to cook and entertain and I hope this simple guide helps you in your next Birthday planning process for “Making Life Memorable” in your way!

Birthday Cake

Birthday Cake

It’s getting closer and closer to finalizing your child’s birthday party. Now its time to look at the actual Day of the party.

Hospitality and food is a big thing in the Middle East…. So serving just cake won’t cut it in this part of the world! If you can get away with it then good on you 🙂

Since a major highlight of the Birthday is the cake, other than the birthday child off course!I’m dedicating this whole post to be about THE CAKE!

While I see so many bakeries in town (Kuwait) and between every cupcake business is another cupcake business I’ve yet to really find one that are tasty and not horrendously expensive.

Cake for KD70+ (about$250) SERIOUSLY! and something seems to always go wrong. The color, the taste, the flavor, the cake is to dry, the frosting’s too hard and the worst is the filling or frosting that tastes like stale butter. To all you bakeries I’m sorry, I apologies but this is my opinion.

Being big on baking and cake/cupcake decorating I make my own cakes and cupcakes. They might not look that professional but I take pride in them and the girls and guests never complained.

Cake from scratch, buttercream frosting, fondant and all. Now you don’t have to go to my extreme but I really think investing a little time doing the cake and pocketing the money or spending it on something else for the birthday is well worth it.

After having done several birthdays I’ve come to a huge realization….. kids prefer cupcakes!!! So even though I’ve made fancy 3 tiered fondant covered cakes at the end it’s pretty to look at but they reach for the little stuff.

The big cake I make for me….I enjoy it! So I’ve downsized from the past.

As a result the big cake is used for the candles, singing and the adults to eat. While the cupcakes are for kids.

To figure out how much to serve use this general guideline:
12″ round cake serves 28
1.5 cupcake per child

This means for every 28 adults you can add a Tier and for 10 kids make 15 cupcakes. Fairly simple don’t you think?!

As for flavors stick to the basics. Chocolate and vanilla, but make MORE chocolate than vanilla!

The best frosting ever is the basic buttercream frosting. Easy to make and spread or pipe.

As for fondant I make a marshmallow fondant which is easy to mold and roll.

Now if you don’t want to spend all that time in the Kitchen a boxed cake and jar of frosting will do the trick just as much. All you need to do is just add some food coloring here and there, sprinkles, ornaments/décor or my personal favorite cupcake picks!!
(Cupcake picks DIY also coming soon!)

So spend a little time in the kitchen, get your kids to mix and measure with you. It’s not just about the end result it’s how much fun you can have on the way!! That for sure falls under “Making Life Memorable!”