Tag Archives: kuwait blog

Unique Prints

Unique Prints

I always have a soft spot for personalization and customization.

There’s nothing more special than something with your name on it or made exactly to your design.

Be it an invitation, a greeting card, gift tag, stationary, monogramed pillows or even mug with a family picture on it. There’s always one site that I just love to go to get these items and that’s Tiny Prints

I can spend hours and hours just looking at the site before even choosing something because every single item there is something I want to own.

Wouldn’t you love an iPad case with pictures of your kids on it?? The lovely thing is you can subscribe and get notifications on deals they have.

Right now they’re having a sale of up to 30% off!! so exciting, I can’t wait to get ordering!!

So what’s your favorite item in Tiny Prints
worth Making Life Memorable?

October Fun

October Fun

Its October and the countdown of every even in my life has began.

You might laugh but this is no laughing matter for me…it’s serious and crunch time has officially started with events galore on the horizon.

This is the time when I bring out the iPad and crank up my pins on Pinterest. Whether I do them all or just a few is besides the point. I know they’re there and I’m confident that I’ll eventually get around to it.

October is the beginning of Fall in my book and the preparation of costume season for Halloween.

One of my favorite things to do is have little crafting sessions with the girls with “Fall Themed” crafts.

I’m not sure how we’re going to do it this year with Jennah being in 3rd grade and overworked between homework and activities. But I really hope that I’ll get around to doing something fun like this with the girls.

Leaf

I would love to go around in our Garden and have the girls collect all sorts of Leaves from the ground.

I’d probably bring down some paint and have them dip the leaves in the paint and make imprints on Paper. Maybe even glue the leaves too. Have actual leaves and imprints would look pretty and introduce them to different “Mediums”.

CUPCAKE


Off course always on the agenda is baking and decorating cupcakes…. These are a few of the designs we’ve made in the past.

It’s time to get more creative and see what the girls can come up with this year….

Perhaps we can make a whole graveyard?? Who knows….


All this aside this month requires a great deal of creativity and skill because it’s off course costume season for the whole family!!

I think we’ve done every kids of costume from purchasing to making….and it’s time we go all over it again….

Here’s a few samples of what we’ve done in the past and I can’t wait to get started all over again!
COSTUMES

I’ve always wanted to have a little Halloween even of my own but with our November birthdays and Christmas preparations I’ve always thought it’s overloading myself.

pumpkin
But we do have one major tradition that we always do and that’s the carving of the pumpkin…. We all go to Sultan and buy a really nice American pumpkin and get all creative in carving it.

Off course Zeenah is assigned to gut it all out, while Jennah is the one that draws out the design and I have the pleasure of carving it all out.

I would like to get more creative and do several pumpkins but unfortunately they don’t last very long because of the heat and they do start to smell.

Maybe this time around we can Paper Mache a Pumpkin…or several pumpkins.

There are just so many ideas that I can’t wait to try out ad share with all my readers. And hopefully in this process I help in Making Life Memorable for you too!!

Cheddar Biscuits

Cheddar Biscuits

One of my girls’ favorite restaurants is Red Lobster. I must agree with them when it comes to their tasty cheddar biscuits.

They are so addictive that it’s extremely difficult to just have one. Totally sinful!!!

I set out to try to make those biscuits as best as I can…. I’ve tried several ways with additions and omissions to finally get the closets thing I could to the real thing.

Try them out and tell me what you think!
Ingredients:
2 1/2 cups Bisquick baking mix
¾ cup cold whole milk
4 tablespoons cold butter (1/2 stick)
1/4 teaspoon garlic powder
1 cup cheddar cheese (heaping), grated

Directions:

Preheat your oven to 400 degrees.

Combine Bisquick with cold butter in a medium bowl using a pastry cutter or a large fork. You don’t want to mix too thoroughly.

There should be small chunks of butter in there that are about the size of peas. Add cheddar cheese, milk, and 1/4 teaspoon garlic.

Mix by hand until combined, but don’t over mix.

Drop approximately 1/4-cup portions of the dough onto an ungreased cookie sheet using an ice cream scoop.

Bake for 15 to 17 minutes or until the tops of the biscuits begin to turn light brown.

Meanwhile Prepare the topping:
2 tablespoons butter, melted
1/4 teaspoon dried parsley flakes
1/2 teaspoon garlic powder
pinch salt

When you take the biscuits out of the oven. Use a brush to spread this garlic butter over the tops of all the biscuits.

Use up all of the butter.
2
This batch made about 14 biscuits.

Off course the minute I put them out on the table Zeenah couldn’t wait to dive right into them!!!

zee

The look on her face says it all…. I’m pretty sure that fits right into Making Life Memorable for her!

Bubbles Kids Entertainment

Bubbles Kids Entertainment

I took the girls to Discovery Mall the other day to play in their play area. A time that they can spend hours on end and it’s never enough.

As I was walking around trying to entertain myself I passed by a little Kiosk called “Bubbles”

The area is a little heaven for little girls. They can act like hairdressers and style doll’s hair, there’s an area that they can color and paint pottery and even take pictures with a life size Elsa cutout.

They also have the option of hosting a kids birthday party. Unfortunately it’s only for weekday birthdays but it would be cute to take the closest friends and have a small birthday on the “real” day.

2


Now that Birthday season has started I hope this helps and gives you an option in Making Life Memorable for your little princess.

For more information about Bubbles Kids Entertainment call 97900381

Birthday Games

Birthday Games

When planning my girls’ birthdays I always like to have at least 2 or 3 games for the kids. I’ve come to realize that all they want to do is just run around and have fun but I still do it anyway!!

One thing I always like to make sure of is choosing a game where everyone is a winner and no hard feelings. There’s nothing worse than making a kid cry on your child’s birthday. So musical chairs is OUT! Too rough and just our mean of a game for me!

The way I avoid any losers is by actually having the kids that are out choose a gift from a huge box of 100fils toys, stickers, bubbles, stationary, colors, play dough….etc Soon some of the kids wanted to loose just to be able to choose a gift from the box.

Off course the games I choose are always theme related.

PassThemonkey


For example, Zeenah’s 3rd birthday was a monkey theme. So instead of the traditional pass the parcel I had pass the monkey.

I used a stuffed monkey that they passed around. Whenever the music stopped the person that had the monkey got to leave the circle and choose a gift from the “Box”.

Last person got to keep the stuffed monkey as their prize.
 

bananaToss
 

I take every opportunity I get to get artistic and crafty.

The minute I found these cute little plush bananas I had a light bulb moment…..

A Banana toss would be a perfect “Monkey Themed” game.


First on the agenda was to get a big cardboard box.

Perfect, conveniently I have a gift shop that I always save some shipping boxes just for occasions such as these!
 
 
box


I took the box and outlines the monkey I wanted.

I then cut out the “mouth” intended for the banana’s to be tossed into.

Off course after that was my favorite part which is painting!!!


MonkeyToss
 
 
It was even better than the way I imagined… The girls were super excited after I had finished it that they played with it constantly before the big debut on the birthday.

For a 3 year old birthday I figured 2 games was just enough and I was right!!!

We had the singing of the birthday shortly after and a chance in Making Life Memorable for everyone involved.

The story of the missing workbook

The story of the missing workbook

mom
 

There comes a time in every mother’s life where she must endure the horror of the missing workbook, homework, journal or Library book.

I’ve been very good about trying to be as composed as possible when these minor things happen.

Mainly because I keep reminding myself it’s just elementary and not Harvard.

Until today…….why today???

I’ve been frantic! Searching high & Low….. tracing back to the beginning

Still no Math Workbook to be found. Worse of all it’s the one that stays home so it must be here somewhere!!!

Then I think to myself OH NO OH NO!!! It’s the weekend and I have no clue where Jennah’s Math workbook. I’m positive and sure we left it where we always do. Yet it seems to have disappeared into thin air.

Usually I would take it with a grain of salt and tell her to look for it except I can’t do that this weekend because she has a TEST!!!

I’m feeling the stress… almost as though I’m the one that’s going to be graded. Well then again parents are judged and graded by their kids performance but that’s a whole other post!!!

I rummage through all the past papers and teacher e-mails. I find the main topics of what’s going to be covered and off to my main man “Google” I go…

Search “Grade 3 Telling Time free worksheet”…Find appropriate page…Print!

Search “Grade 3 Money (USD) free worksheet”…Find appropriate page…Print!

Search “Grade 3 Number Patterns free worksheet”…Find appropriate page…Print!

Search “Grade 3 Name Collection Boxes free worksheet”…Find appropriate page…Print!

Search “Grade 3 Place Value free worksheet”…Find appropriate page…Print!

GREAT!!! sigh of relief, my own homemade workbook. Funny even in this I have my own DIY.

The dilemma still remains as to where did Jennah’s Homelink Workbook disappear too??? Come Sunday and we shall see!!

With that I will leave you with a few websites I stumbled on that any mom will find useful…

Home School Math
Everyday Math
Math Aids
Kid Zone
Super Teacher Worksheets
Math Tube
K 5 Learning
IXL

So to all you mommies out there that struggle with you child’s responsibility there is comfort in that they will grow out of it…but for now we do what we can to ensure that we come out of it alive and still sane!!!

Here’s Making Life Memorable one Math worksheet at a time!!

Lady Bug Piñata

Lady Bug Piñata

As much as I’m not an advocate of distributing candy to children I cannot resist a good old fashioned Piñata.

A fun ritual I think for me to make and for the kids to destroy.

For Zeenah’s 4th birthday she had picked the perfect theme to design a Piñata for. I would actually dream about what the “Ladybug” Piñata would look like and couldn’t wait to start on it during the planning process.

Let me walk you through what I did for Zeenah’s Lady bug Piñata.

One of the most important things when making a homemade Piñata after the Paper Mache recipe is the base.
Sounds complicated?? Not really!!

The base consists of none other than a plain ‘ole regular balloon. PM-Balloon

It’s not the balloon that makes the piñata it’s how you design it after wards that makes it fabulous.

The first thing I did was attach two balloons.

The large 3′ balloon was t make the body of the Lady bug and is the part to be popped after completion to add the candy into.

The other balloon was a regular 18″ latex balloon that I used as the head of the ladybug.
 

I used red balloons just for fun but the color really doesn’t matter because it’s all going to be covered anyway!!

The next step is the REEEEEELLy messy part.

The dipping of the news paper strips into the Paper Mache past and gluing on top of the balloons.

The important part is to make sure you leave an opening at the top in order to be able to fill the piñata with candy.

PM-Newspaper
 
 
After you finish putting the first layer of newspaper strips is to leave it to dry before putting another layer. I always wait at least a day before putting the following layer.

I like to put 4-5 layers of Paper Mache strips to make sure that it’s strong enough.

The entire process usually takes me a 5 days between paper Mache strips and drying time.

Now the artistic part begins!!!

PM-crepe
 

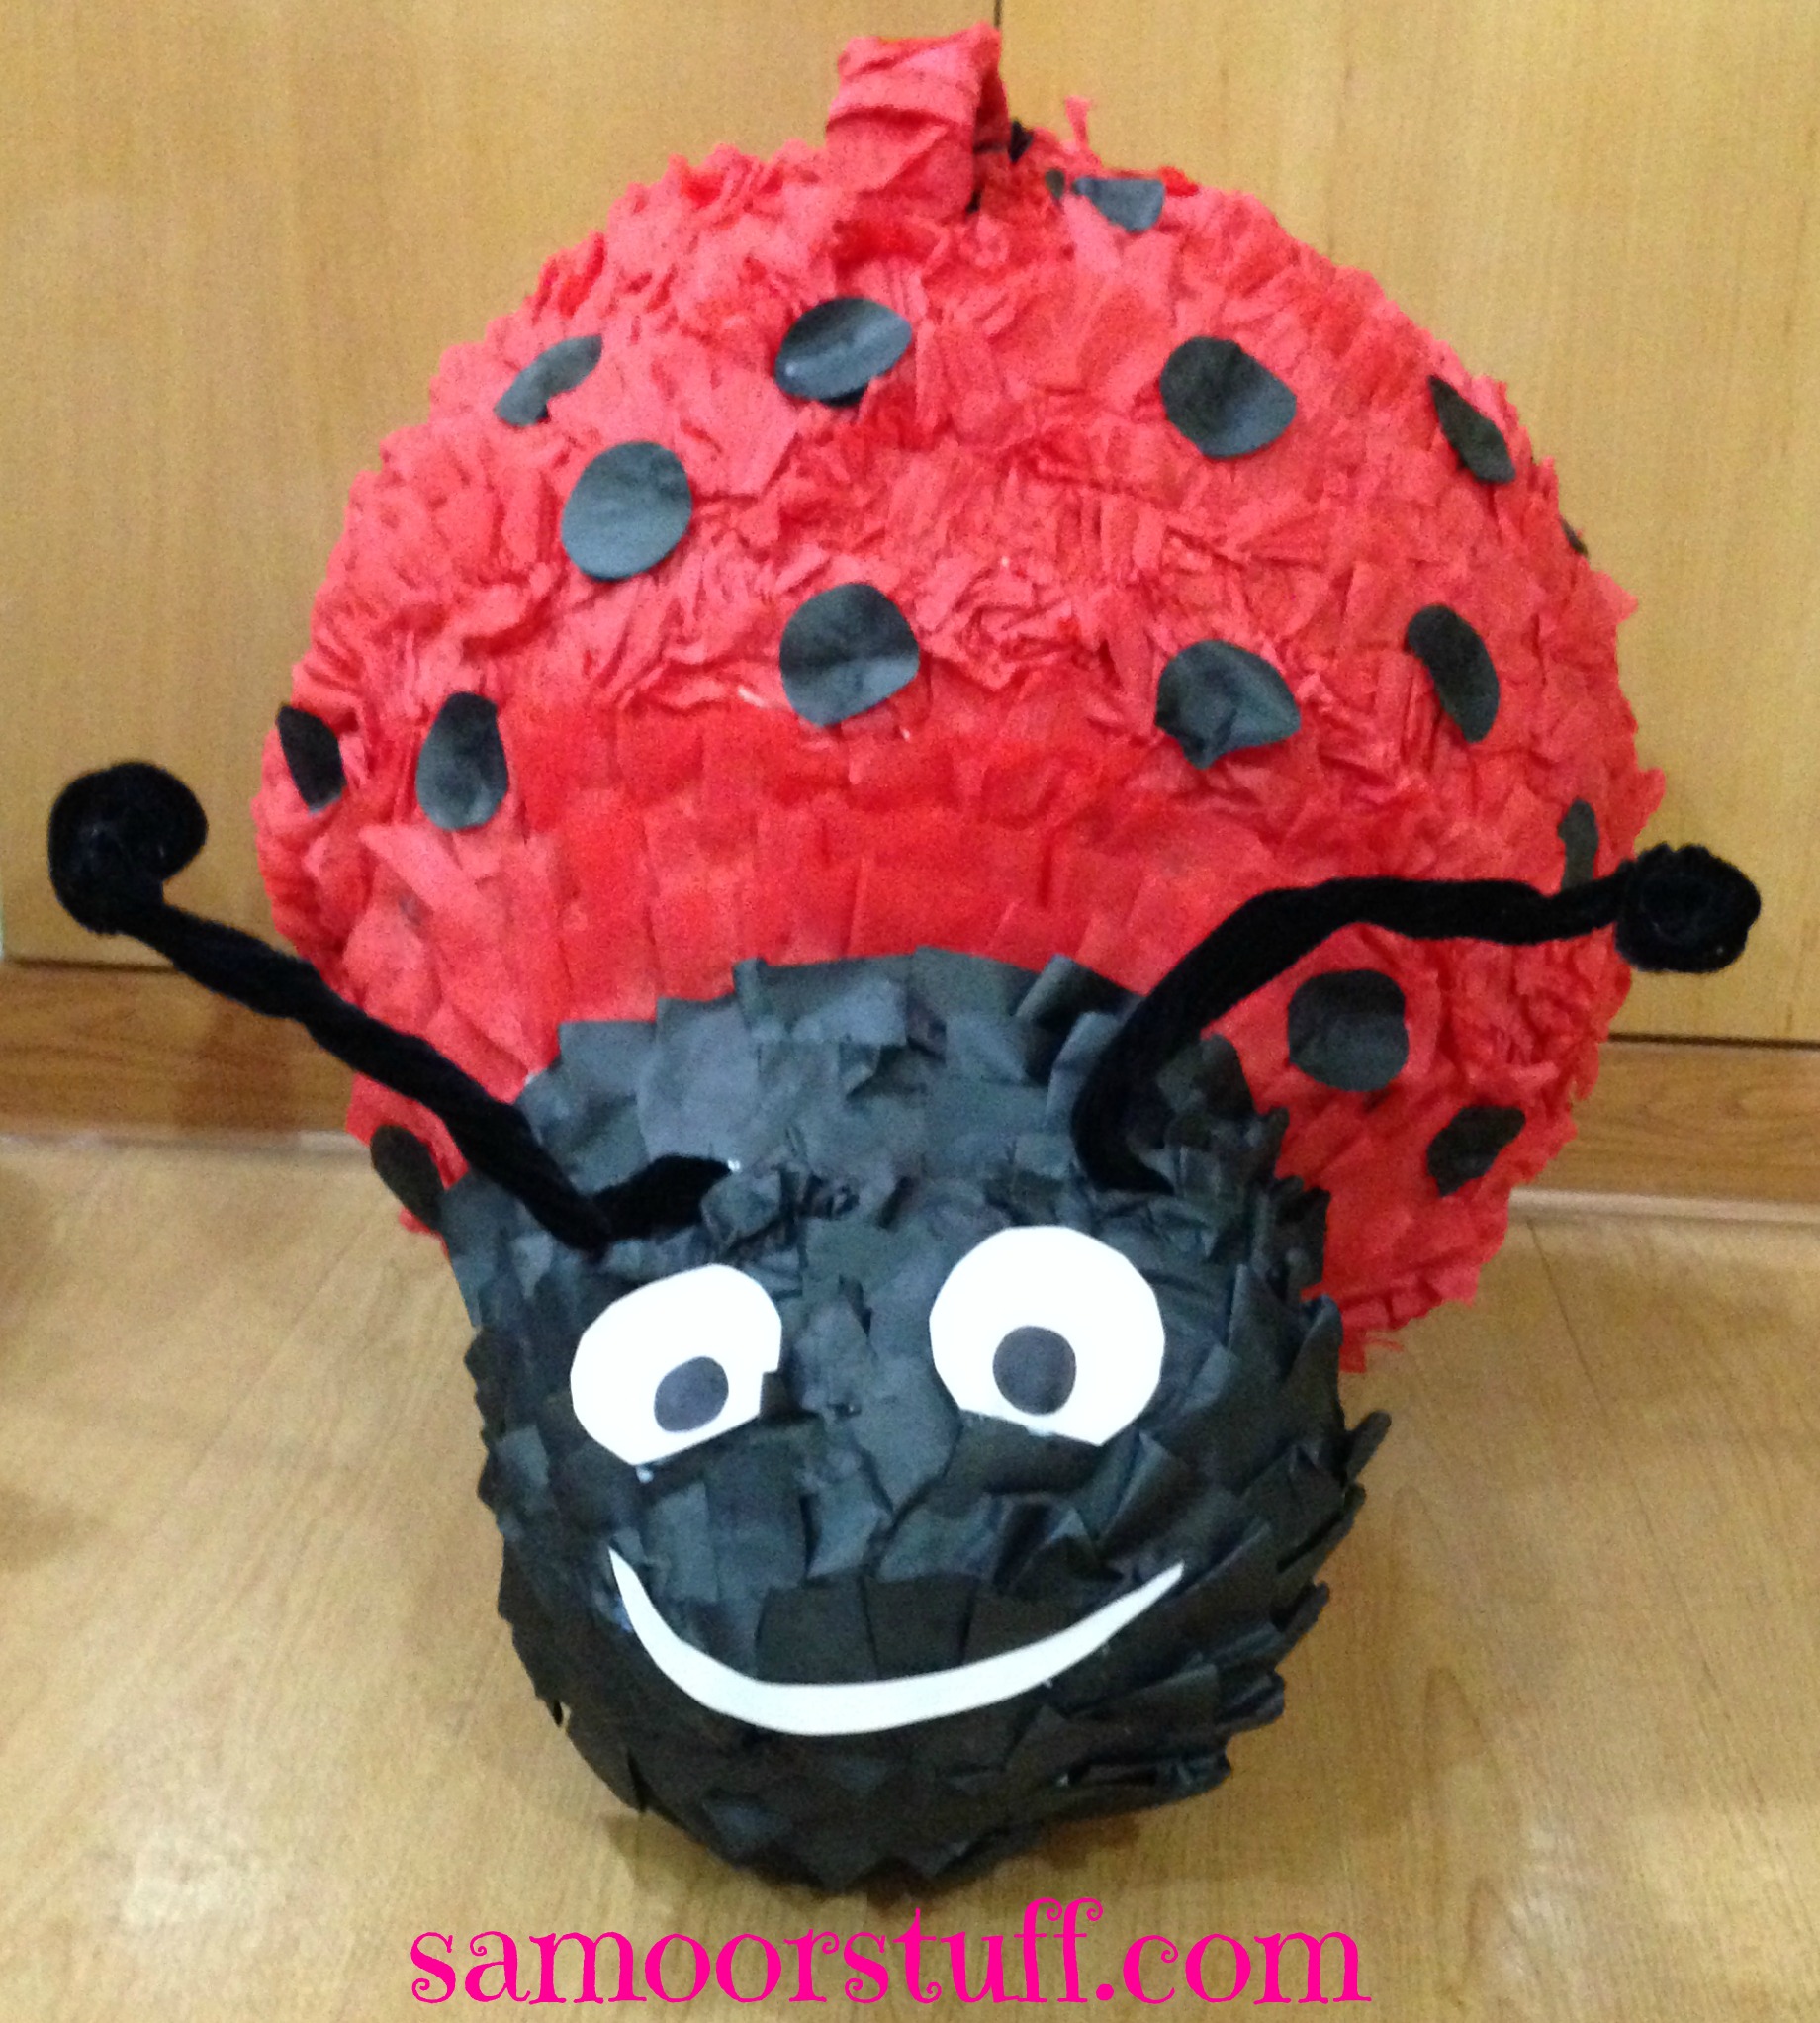
I bought red and black crepe paper to cover the body and head of my “ladybug”.

This was such a tedious and time consuming task because I insisted on making the crepe paper ruffled.

It would have been much easier to just glue it on without the extra designing but then again it’s me we’re talking about and I love making life difficult for myself!!

The body was covered in red crepe paper and I had covered the head in black.

I kept the balloons intact and decided to pop it at the end to make sure that the Paper Mache is completely dried and stable.

You also have to remember to make sure you keep the opening at the top of the piñata uncovered with crepe paper to be able to pop the balloon and fill with candy.
PM-spots


I used my 2″ round punch to make the spots of the lady bug by making circles out of black construction paper.


PM-with spots
 

I then stuck the spots onto the body of my ladybug. The hardest part in this process was to glue the spots randomly. I’m such a uniform person that I found a few spots that were aligned with each other.

But towards the end I tended to stick some of the spots closer to each other jus to get the random look.

PM-eyes


With regular white construction paper I cut out the outline of an eyeball and drew the pupil with a black marker.

I think this was the easiest part in the whole piñata project.


PM-withface


The final part of the piñata design was to stick the eyes onto the ladybug head.

I also made a little smile using white construction paper to make the lady bug look a little more friendly.


PM-antlers


Using several black pipe cleaners I had made antennas for our little bugger.


Drum roll please for my piñata masterpiece!!!
 
PM-complete
 

The final task is always left for my husband, I create but he’s in charge of implementing my visualization.

After filling the piñata with candy and turned out to be extremely heavy and I left him with the challenge.

This is what it looked like in our garden!!!

PM-garden

I made a mess in the process of Making Life Memorable and I enjoyed every minute of it!

Tooth Fairy Door

Tooth Fairy Door

The wonderful world of make believe is such an amazing place to be, I remember as a child when you thought EVERYTHING was real… Call it the Disney syndrome or perhaps it’s the Peter Pan? Whatever the name it’s all the same a world where everything is magical that’s where I want to live.

If any of you out there is like me with “issues” about being a grown up I’m sure you’d agree. Life was so simple when the worst thing was your mom not letting you go to a friend’s house and you’d feel like it’s the end of the world.

If we only knew what was REALLY in store:) Well moving right along before it turns into a therapy session…….

The world of make believe. Santa, Tooth Fairy and the Easter Bunny are those things that make you tingle and feel young.

I had to make the experience of Jennah’s wiggly tooth and the much awaited Tooth fairy visit extremely special.

I decided to make a little tooth fairy door for that occasion. I debated for a while if it should be a surprise or make Jennah involved but I figured it would make it all that more special if Jennah made it.

So here’s your inspiration and How to…..

TOOLS
You’ll need:
Ruler
Cardboard (about 18cm x 11cm, 7inchx4.5inch)
3 Popsicle sticks
Glue
Pencil
Glitter
Beads
Paint
Pipe cleaner
PomPom
Any cutting tool (scissors, razor blade..)


Directions:
Measuring and cutting the door.

B1

B2

 
Place 2 of the popsicle sticks on the sides of the cardboard from the bottom to make and the third on the top to attach the other two making a rectangle.
 

Mark the inside of the sticks with a pencil.
 
With your cutting tool, I suggest a razor blade, cut the left marking and top all the way through. Slightly shear the right marking to enable you to bend it easily.


Cut the top of the door as to resemble a rooftop.
B3


B4
B5

Paint the cardboard white or any color your child prefers.

Other ideas would be to either use white cardboard or cover it with tissue or construction paper…

We went with painting because it’s just more fun for the kids!


Off course the challenge is to keep them occupied with something else while the paint dries.

My suggestion is stick to the Tooth Fairy theme and either makeup or read a tooth fairy story or find cute facts online about Tooth Fairies.

Glue the popsicle sticks on the sides and top of the cut/ folded edged of the cardboard.

B6


B7

Now the real fun begins….

Let your child paint and design the door the way they like. In my world that’s really hard to ust let them do it “their” way.

If you have a younger child that’s continuously getting into the older child’s work keep them involved tooo….

I gave Zeenah a big piece of cardboard to paint. That really kept her busy and away from her sister’s project.

B8

  
B9
After the paint has completely dried it’s time for the Fairy Décor!
  
D10

Jennah added the beads, glitter, pompom for the door knob and the pipe cleaner for the door knocker.
 
Now you have a gorgeous Tooth Fairy Door that can be placed anywhere the night of the lost tooth allowing her to enter and surprise your child with something in the morning.

Here’s Making Life Memorable one lost tooth at a time!

Friday weekend or not??

Friday weekend or not??

It’s always funny how as a mom you can’t decide if you do or don’t have a weekend.

Don’t get me wrong!!!! I love spending time with my kids and being creative every chance that I get. But at the same time there’s a fine line between enjoyment and borderline going insane with activities.

Thinking a weekend will be a weekend is a joke for any mom with kids under the age of probably 10/11. At that age kids don’t want their mom or parent and just want to hang out with their friends and parent’s are glorified and unpaid chauffeurs.

Let’s take today for example. A day were you’d think I would have a chance to at least get a few extra Zzzzzzs. Nope not true!

Wake up early and start doing homework with Jennah knowing that wee need to squeeze as much in because we have a busy weekend and week. Mean while Zeenah’s doing a page of her workbook and insisting to do it her way.

I quickly jump in the shower and we head out for a breakfast & play date with a friend and her kids to discovery mall.

Thank fully while the kiddos are in the play area we do get a chance to have some grown up talk over coffee….with our eyes peeled at the kids direction. Yet every whine, cry or scream we hear we assume its our children.

After a full morning we come back home in the afternoon to more home work and active learning play. Because God forbid should I rest right?

Next we are all dressed up to head to a birthday at the Little Gym.

So I ask myself probably more often than not are my girls going to be able to keep up with me or is it the other way around.

At the end of the day I still seem to think I didn’t cover something. One thing is for sure, I’m positive I’m Making Life Memorable for our little family one day at a time.

Paper Mache

Paper Mache

There is something fascinating about getting your hands dirty and being messy while doing some craft or arts project. I’m not talking about just for kids but also as an adult.

Maybe it’s the feeling like you’re a kid again and reliving your childhood but I never realized how thrilling it was until I actually got my hands dirty.

Part of planning my girls’ birthdays is making the piñata. An easy yet long process because of drying time, especially if you want to make it into a specific shape.

The key to making a good piñata isn’t just the design but also having a really good Paper Mache recipe.

I would love to use professional Modge podge but unfortunately it’s not sold in bulk and isn’t cost effective for big destroyable projects.

Many recipes use Elmer’s or white glue as an adhesive which also falls into the same category as my former statement.

I’m all for saving a Fils (or more) in everything I do and I would rather save the money for something that’s more lasting than a piñata that’s going to be beaten to death and thrown into the recycle bin.

Hence I present to you a fabulous Paper Mache recipe that’s easy to make and fantastic to handle.
Paper Mache


Mix the following ingredients:
2 Cups Flour
4 Cups Water
2 Tablespoons Salt (optional, prevents rotting)


All you need now are newspaper strips, dip each strip into the Paper Mache paste and get dirty!!!
paper


Have fun Making Life Memorable extra messy!!

See hoe you can use this recipe in my LadyBug Piñata Post!