Tag Archives: homemade

Tooth Fairy Door

Tooth Fairy Door

The wonderful world of make believe is such an amazing place to be, I remember as a child when you thought EVERYTHING was real… Call it the Disney syndrome or perhaps it’s the Peter Pan? Whatever the name it’s all the same a world where everything is magical that’s where I want to live.

If any of you out there is like me with “issues” about being a grown up I’m sure you’d agree. Life was so simple when the worst thing was your mom not letting you go to a friend’s house and you’d feel like it’s the end of the world.

If we only knew what was REALLY in store:) Well moving right along before it turns into a therapy session…….

The world of make believe. Santa, Tooth Fairy and the Easter Bunny are those things that make you tingle and feel young.

I had to make the experience of Jennah’s wiggly tooth and the much awaited Tooth fairy visit extremely special.

I decided to make a little tooth fairy door for that occasion. I debated for a while if it should be a surprise or make Jennah involved but I figured it would make it all that more special if Jennah made it.

So here’s your inspiration and How to…..

TOOLS
You’ll need:
Ruler
Cardboard (about 18cm x 11cm, 7inchx4.5inch)
3 Popsicle sticks
Glue
Pencil
Glitter
Beads
Paint
Pipe cleaner
PomPom
Any cutting tool (scissors, razor blade..)


Directions:
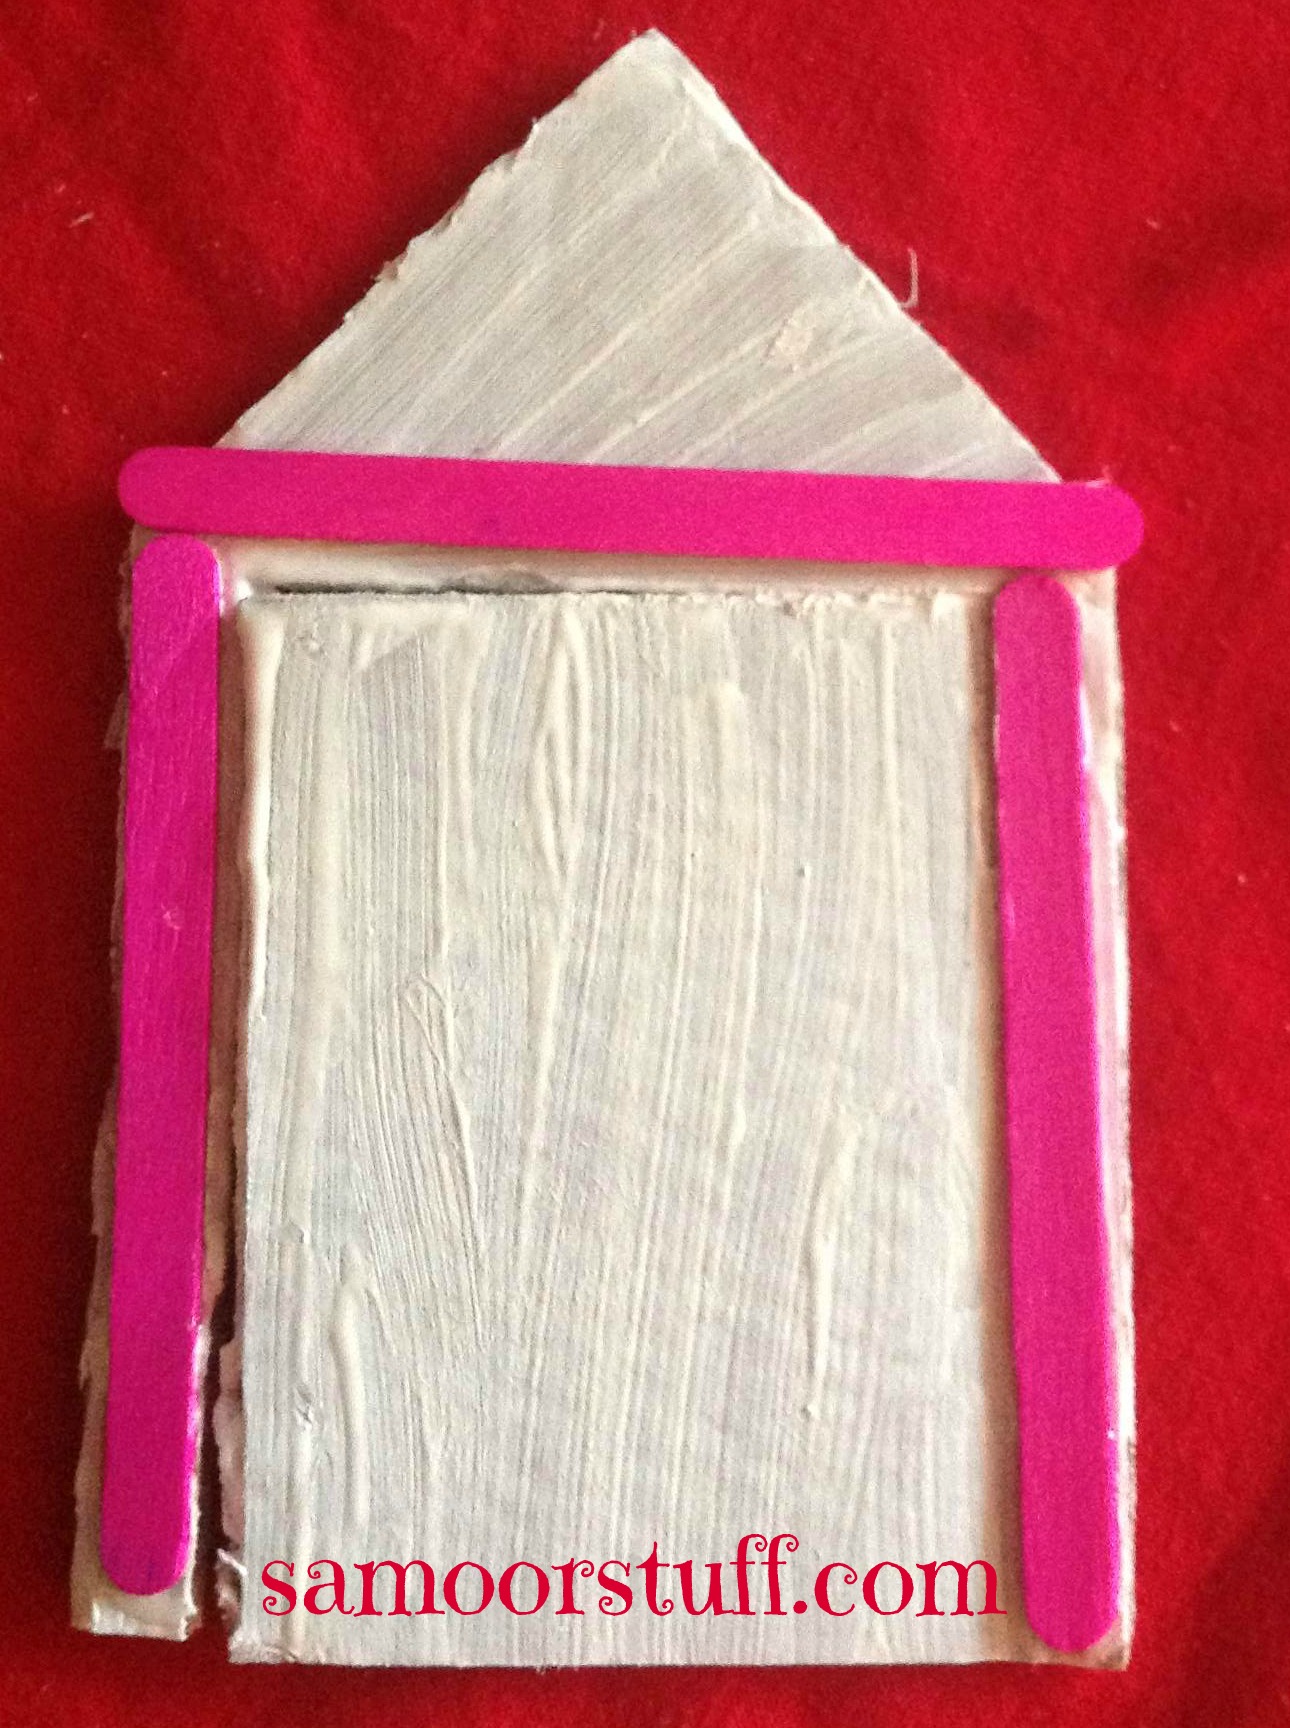
Measuring and cutting the door.

B1

B2

 
Place 2 of the popsicle sticks on the sides of the cardboard from the bottom to make and the third on the top to attach the other two making a rectangle.
 

Mark the inside of the sticks with a pencil.
 
With your cutting tool, I suggest a razor blade, cut the left marking and top all the way through. Slightly shear the right marking to enable you to bend it easily.


Cut the top of the door as to resemble a rooftop.
B3


B4
B5

Paint the cardboard white or any color your child prefers.

Other ideas would be to either use white cardboard or cover it with tissue or construction paper…

We went with painting because it’s just more fun for the kids!


Off course the challenge is to keep them occupied with something else while the paint dries.

My suggestion is stick to the Tooth Fairy theme and either makeup or read a tooth fairy story or find cute facts online about Tooth Fairies.

Glue the popsicle sticks on the sides and top of the cut/ folded edged of the cardboard.

B6


B7

Now the real fun begins….

Let your child paint and design the door the way they like. In my world that’s really hard to ust let them do it “their” way.

If you have a younger child that’s continuously getting into the older child’s work keep them involved tooo….

I gave Zeenah a big piece of cardboard to paint. That really kept her busy and away from her sister’s project.

B8

  
B9
After the paint has completely dried it’s time for the Fairy Décor!
  
D10

Jennah added the beads, glitter, pompom for the door knob and the pipe cleaner for the door knocker.
 
Now you have a gorgeous Tooth Fairy Door that can be placed anywhere the night of the lost tooth allowing her to enter and surprise your child with something in the morning.

Here’s Making Life Memorable one lost tooth at a time!

Paper Mache

Paper Mache

There is something fascinating about getting your hands dirty and being messy while doing some craft or arts project. I’m not talking about just for kids but also as an adult.

Maybe it’s the feeling like you’re a kid again and reliving your childhood but I never realized how thrilling it was until I actually got my hands dirty.

Part of planning my girls’ birthdays is making the piñata. An easy yet long process because of drying time, especially if you want to make it into a specific shape.

The key to making a good piñata isn’t just the design but also having a really good Paper Mache recipe.

I would love to use professional Modge podge but unfortunately it’s not sold in bulk and isn’t cost effective for big destroyable projects.

Many recipes use Elmer’s or white glue as an adhesive which also falls into the same category as my former statement.

I’m all for saving a Fils (or more) in everything I do and I would rather save the money for something that’s more lasting than a piñata that’s going to be beaten to death and thrown into the recycle bin.

Hence I present to you a fabulous Paper Mache recipe that’s easy to make and fantastic to handle.
Paper Mache


Mix the following ingredients:
2 Cups Flour
4 Cups Water
2 Tablespoons Salt (optional, prevents rotting)


All you need now are newspaper strips, dip each strip into the Paper Mache paste and get dirty!!!
paper


Have fun Making Life Memorable extra messy!!

See hoe you can use this recipe in my LadyBug Piñata Post!

Date Cake & Caramel Sauce

Date Cake & Caramel Sauce

The amazing thing about living in Kuwait is that there’s always fresh dates. Tasty and sweet!!

We have a great Palm tree in our garden that blesses us every summer with dates.

Off course with that blessing comes a big responsibility of having more dates than one can handle…. To that I dedicate this fabulous Date Cake that my mother is very famous for and I’ve made it my own.

Enoy!!

DATE CAKE
Ingredients
1 cup Butter                      1 ½ Cup Flour
1 Cup Icing Sugar            1 Teaspoon Salt
1 Egg                                    1 Tablespoon Baking Powder
1 Cup boiled Water         ½ Tablespoon Baking Soda
1 Cup Pitted Dates

Instructions:
Step 1 Preheat oven to 300ºF. Spray baking pan with vegetable pan spray and coat with 1 tablespoon flour.
Step 2 In a bowl, Soak Pitted dates in the boiled water.
Step 3 Blend butter, icing sugar & egg
Step 4 Add remaining ingredients (except date & Water) to the butter mixture. Blend well. Add Date & Water mixture & mix until all combined.
Step 5 Bake 45 minutes or until toothpick inserted in center comes out clean. Cool.
Step 6 Pour Caramel Sauce over cooled cake.

CARAMEL SAUCE
Ingredients
1 cup Sugar                             1 tablespoon Yogurt
½ Butter                                    ½ cup Milk
1 teaspoon Baking Soda      1 Tablespoon Honey
1 Teaspoon Vanilla

Instructions:
Combine all ingredients in a saucepan and cook over medium heat stirring constantly until it becomes thick & brown.
Pour over cooled Date cake.

This cake is so good that it’ll no doubt be Making life Memorable every bite you take.

Quick Fix Dinner

Quick Fix Dinner

There are times in every mother’s life where all she needs is a quick fix dinner because some activity ran too late and bedtime is approaching and there isn’t much time to prepare a “proper” Dinner.

On days like these I often turn to a simple mix & Match of veggies.

Those days I open up my freezer and it’s vegetables feast!!

IMG_5329

So the menu is:
Green Peas & Corn
Brussels Sprouts
“House” Salad with oil & vinegar dressing
Edemame
Cream of Mushroom Soup

Healthy, filling and quick dinner what more can a mom ask for after a hectic day?

So the next time you’re stuck and don’t have time remember Mix & Match what you have and concentrate on Making Life Memorable.

LadyBug Photo Booth

LadyBug Photo Booth

One of my favorite parts of planning the girls’ birthdays is getting creative with a photo Booth. The more I do them the more I begin to elaborate.

Last year Zeenah chose to have a Ladybird birthday. I had made everything black and red with whatever I can make. From table cloths to paper pompoms. It also made my life easier in thinking of ideas for the photo props.
PhotoTable-LB
 
 
I made callout signs that said “No bugging allowed” and “Happy Birthday Zeenah!”

I also got red sunglasses from the 100fils store and added googly eyes and antennas using black pipe cleaners.

Conveniently I also found Red Happy Birthday sunglasses and a Glittery red cowboy hat that I didn’t have to add anything too!


Next came the actual photo Booth. We are very lucky to have a great big olive tree with amazing branches to hang things on. My decorating engineer (AKA my husband) had the task of implementing my visualization.

We had a great red vintage looking frame that we hung on our Olive tree and a collection of home made red pompoms. Off course the first picture to be taken in the booth has to be a CUTE sister picture before we bring out the sillies!!
girls

Zeenah insisted that I buy the same dress for Jennah because according to her she wanted to be “twins”
 

Then off course it was photo time for the kids with the props With friends and family. It was so enjoyable seeing all the kids grabbing props and posing for the camera. It became a form of entertainment for the kids.

JOJO

aya


I hope this has inspired a few ideas for your net birthday even and helps in Making Life Memorable for you!

Recipe Binder

Recipe Binder

One of the hardest things as we grow older is buying a meaningful birthday gift. I was recently challenged with that with one of my friend’s birthdays.

I had no idea what I could possibly get her that was worth her friendship and wouldn’t dent my budget… We are very similar in some of our hobbies and one thing she always came back to me about was some of my recipes.

So I came up with making her a personalized Recipe Binder. Thankfully there were so many samples that I found on pinetrest to help me get my creative juices flowing. I wanted to go simple and meaningful and my design had to be just that.

The first thing I did was buy a regular Binder and separators from the bookstore.
 

BinderLabel
 

I Chose to go with a chevron design for the labels so I made those for the cover, the separators and separator sides.

Then printed out a few of my favorite recipes to put inside the binder as a quick start.


Binder1


Viola a meaningful, personalized birthday gift.

I was actually very please and the objective of meaningful was spot on when I saw my friend’s reaction when she unwrapped her gift. It left the exact impression I had intended and that Making Life Memorable!

Zeenah’s 4th Birthday

Zeenah’s 4th Birthday

I sometimes feel like March is the end of celebration season for me. We go from the high of October through September with a break in January. Then the Rush of February and March then comes SILENCE! Until the cycle returns.

If you’ve been following me this past almost year then you know how serious I am about celebrations. If this is your first read you need to know that almost every “Occasion” post comes in many parts so stay tuned because I usually have A LOT to say and share.

I take pride in almost every planning detail of every event I host. No matter how small or big I must have something special. Thankfully I have instilled that same trait in my children and it has also rubbed off on my husband. The First step in my birthday planning process for the girls is to ask them what Theme they would like. Off course many times I “veto” and “probe” but many times I like the suggestion they come up with.
 

Zee4th
Zeenah declared her 4th birthday as a “Lady Bug” theme and I was oh too eager to oblige! So much I can work with I was over the moon!! As you can see I also managed to dress her up in theme (which she insisted on having her sister have the same dress too.) Over and above that she asked me to make her a ladybug crown because according to her the guests won’t know who the birthday girl is…. not sure why she would think that since everyone was coming because it was HER birthday….not that I minded off course!

The most exciting thought was the Piñata…. I used to dream about it!!! And oooohhhhh the use of paper Mache, Who doesn’t like a good old fashioned mess??

So stay tuned on all my DIYs, Pictures and fun of Making Life Memorable!

Photo Booth

Photo Booth

One of my favorite things to prepare for the girls’ birthdays are props for our DIY photobooth. There are companies out there that set it up for you but I like to do it myself and people nowadays are all photographers with their smart phones so they get to play and have fun on their own without a professional “probing”

We always have a theme for our birthdays so I always have to make sure that the props I make are related. Then I just add the usual things like funky sunglasses, Boas, decorative items that can be used as props.

MonkeyPhotoProp
For Zeenah’s 3rd birthday she wanted a monkey theme so I had printed out a template of a monkey mask.

I then cut out the outline of the mask on brown cardstock. The details of the face and ears with off-white paper.

The step of cutting out the eye holes evenly was a challenge but I managed to do it.

I added a little flower on the monkey’s ear and a little detail on the nose.

Off course the last step is adding the stick for kids to hold the mask up. I use craft sticks that have rounded tips (if I have them available or can find them) I have used the wooden skewers in the past but made sure I taped the sharp ends.
monkeymask

The next on my list was to make a sign to put on the Prop table. I was lucky to find funky frames at one of the local 100fils stores (the Kuwaiti equivalent of the dollar store) so I bought all the colors they had. I knew they would come in handy some day.

monkeyFrame

table


Lastly was the setup of the actual booth. We’re lucky to have a big garden that hosts our birthdays. We have an olive tree that provides the best branches to hang an empty frame border, balloons, paper chains and whatever else I can think of. Here’s me posing with my monkey sunglasses during Zeenah’s 3rd Birthday.
PHOTOBOOTH


HeartsProps
 
 
Jennah’s 7th birthday she had chosen a queen of hearts theme.
I absolutely and utterly enjoyed planning and decorating for it.
It was so hard to actually make decisions to STOP.
I had made lots of props for that. Queen of hearts hair & Crown, Heart lips, Cheshire cat smile, Mini Golden crown and Teedle Dee/Dum cap.


An Now it’s time to plan Zeenah’s 4th Birthday coming in March!!!

Its all about making life memorable!!

Yarn Scrap

Yarn Scrap

My girls Love to play with yarn. Yes it’s a random thing we have in our household but give them a ball of yarn and they’re like little kitties thinking of what to do with them.

After many yarn crafting sessions, scissors and just cutting for no reason I end up with all sort of lengths of yarn.

YarnIn an effort to keep everything organized I collect all the scraps of yarn and into the Yarn box they go. Well one fine Friday morning while thinking of a crafting session with the girls I decided its time to get “yarny”.

I had the girls sort out all the different colors and try to unknot as much as they can. Off course some were just unknot-able and we had to cut them leaving us with odd lengths and that’s when I had a moment. Lets just do Yarn pompoms. A great way to recycle all this little pieces!


First we placed a large loop of orange yarn as the base of the pompom. Loop


Next it was placing all the different colors and stacking them up over the looped yarn. placement


The last step was weavng the loose end of the looped yarn into the loop and tightening it. looping

Viola!! A Yarn pomom was made 


 Pompom


And more importantly the yarn box is nice and neat…..for now!
organize

Jennah’s 7th Birthday

Jennah’s 7th Birthday

We Love having themed birthday parties and there’s nothing more satisfying than seeing it all come together.

This year Jennah chose to have a Queen of Hearts birthday party. A basic red & black with hearts, “How hard could that be??” I thought! Well in my head things always seem to start simple but I’m not one that does simple. I loooooooooooooooooooooove over the top! “Bigger” and “more is more” is my thing.

So I go old fashioned and grab a pen and paper and start writing my to dos.
1. Invitation & Guest list
2. Cake
3. Set-up
4. Menu & cake
5. Favors
6. Games
Off course I wrote that list but knew that things will definitely be added along the way.

First on the list invitations & Guests.

So I pull out the file on my computer with last years list and print it out. We had a few scratched out names and I also had to give Jennah her list of school kids that she made.

Then the fun part of designing the invitation.

invite-craft


I knew I wanted to have red envelopes and red cardstock for the card. So it was important to make a run to a stationary store before undertaking the design stage. I had to get the envelopes first because only then would I know what size to make the invite.

My second decisions was to design the card for printing on regular white A4. It would just make my life so much easier in getting the color scheme.

A few hours behind the computer and a little cutting here and there.


The final result of a few hours work was something I was very proud of!
invite2

7th Birthday memories are beginning to shape up. After all it’s about “Making Life Memorable!”